Closet Shelves
In this project, I followed the general design from here, with the crucial difference being that because I wanted to use “solid” shelves instead of individual 1x4s, it was a much more involved project. I learned the value of a good jointing jig (which I bought), generally how to join 1x4 boards edgewise so that the finished “sheet” is pretty much indistinguishable from a single solid board.
Pictures
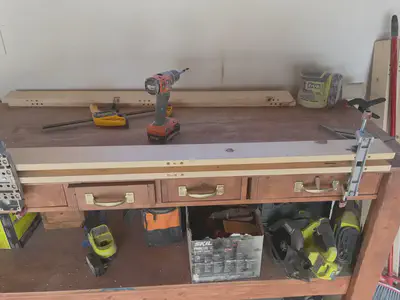 | |
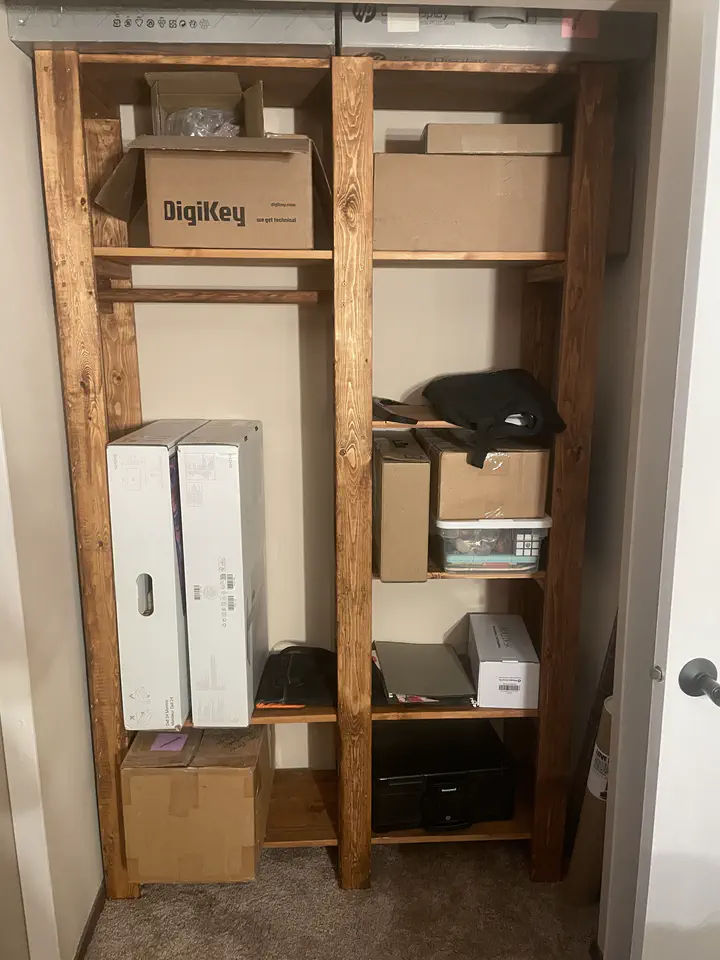
| The joining jig in use. Having 9 holes via 48" of board made all of my edge-joints line up perfectly for a nice tight fit. | Finished, and installed in the closet! |
Lessons Learned
Materials
- When selecting materials to be used in edge-joined shelves, pick boards of the same thickness. I picked a mix of yellow and white pine boards which were about 1/16" - 1/8" different in thickness, which resulted in a LOT of extra sanding.
Building
Don’t skimp on a jointing jig. I spent $70 on mine, and it was absolutely worth it–I got perfectly aligned boards every time.
Don’t rush joining: only ever join 1 edge at a time; that is, don’t try to join together 4 1x4s edgewise simultaneously. When you do that, the final product is much more likely to bow/smile if the edges aren’t perfectly 90 degrees. If you only add one new board at a time to a joint, it is much easier to clamp everything together tightly enough so that even if the edge angles aren’t 90 degrees, the final produce doesn’t bow.
If you are using every one of your clamps simultaneously, you don’t have “just enough” clamps–you don’t have ENOUGH clamps.
Sand long boards to finish on the faces before you cut them into e.g., 12" chunks. MUCH easier to sand that way than to sand the smaller pieces.
If you want to have a piece be EXACTLY say 12" after both ends are finish sanded, you can’t cut it to EXACTLY 12" with the saw. That is, when you make your mark/draw a line, it needs to be > 12". Probably about 1/32" - 1/16". This results in all boards being a good bit longer than they need to be, but they can they all be sanded to EXACTLY the desired length.
When marking lines for cutting, don’t use a mechanical pencil–lines are too thin. Instead, use a sharp carpenter pencil, and always “keep” the line when making the cut; the width of the line should be 1/32" - 1/16", which if the line is drawn on the “keep” side of the board at EXACTLY e.g. 12", then this will result in the right amount of extra material so the finished material is exactly the length you want.
Sanding is like 90% of the total time for an indoor/finish carpentry project. As a result, investing in a really nice sander is much more important than investing in a really nice circular saw. Using the cordless RYOBI sander was a terrible idea–the sander you use for this should absolutely be corded. Corded sanders are more powerful, and you don’t have to worry about having to stop and wait for a battery to recharge. If you have LOTS of spare batteries, then the waiting is not an issue, but the lack of power compared to corded sanders still is.
Dust collection with a vaccuum/dust collector is pretty much required when doing extensive amounts of sanding. I didn’t have this, so everything in the garage ended up covered in a thick layer of dust.
When sanding the outer edges of joined boards for shelves, you have to be very careful to keep things square by going back and forth across the whole edge slowly and carefully. I didn’t do this, and ended up with shelves which were very subtley not square, and were in fact parallelograms.
150 grit sandpaper is the minimum grit for finish carpentry.
When sanding, swirl marks might only appear once staining is done, so you need to be careful to:
Never set the sander down on the piece while the disk in in motion
Don’t push hard when sanding.
I ignored both of these and ended up with some avoidable swirl marks. There were also a bunch of marks that were just from the sanding pad of the RYOBI sander I was using which could have been avoided if I had used a new sanding pad.
When you are going to have to assemble something in place, add some extra padding/space to however large you think you can make something and have it still fit in the space. I got VERY lucky here, as I was juuusssttt able to get the shelves into the closet diagonally.
Staining
Do a “dry fit” for projects like this freestanding–before staining. I waited to do that until after staining, so I had to take apart/put the shelves back together an additional time AND do a bunch of touch up staining.
Do staining outside whenever possible–certainly NOT in the dusty space you’ve been sanding in.
John Harwell
Researcher and Engineer
Experienced embedded systems engineer whose research interests include multi-agent modeling and behaviors, swarm intelligence, bio-inspired algorithms and multi-robot systems, and computational optimization.